Per student, pair, or group:
- Box cutter
- Cup (to fill with water and use for testing)
- Scissors
- Tub, bowl, or other wide-mouth container to catch the water
- Water, in a half-gallon container
Additionally, provide a variety of building materials for students to explore. Some possibilities include:
- Cardboard (boxes, long tubes, pieces)
- Glue
- Rubber bands
- Tape (packing, duct, masking)
- Waterproofing materials (e.g., waxed paper, aluminum foil, plastic wrap or bags, garbage bags, etc.)
- Yardstick or tape measure
Design an aqueduct to transport water from one location to another.
Background
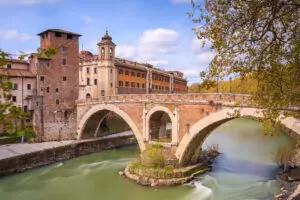
Engineers plan and design the large systems that towns and cities need to function. This includes transportation (roads, tunnels, bridges, highways), telecommunication (phone, internet), electrical grids, and water systems. Water systems include aqueducts, channels that are made to transport water from one location to another. They were first designed by engineers in ancient Mesopotamia during the ninth century BCE; however, the Roman aqueducts are the most well-known. The Romans built elaborate above-ground, arched aqueducts that still survive today, although most aqueducts were underground and made of stone or terra-cotta pipes. The aqueducts were built at a slight angle, enabling them to use gravity to move the water. Water was transported from faraway springs into cities to supply fresh, clean water for drinking and to fill large public baths and decorative fountains. Over a period of 500 years (from 312 BCE to 226 CE), 11 aqueducts were built to bring water into Rome. Some water traveled as far as 57 miles to reach its destination.
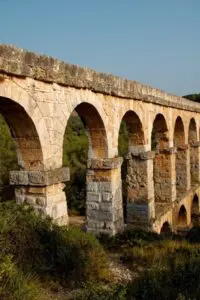
Image by Loyloy Thal from Pixabay
How to Use This Activity
- Review the Leader Notes and Student Instructions. Then decide how to group students to complete the activity. If possible, have students work in pairs or small groups, since the aqueducts need significant space and require many hands to build.
- Make copies of the Student Instructions so that each student has their own copy to reference during the whole-group activity.
- Consider collecting some materials ahead of time and asking students to bring items from home. Students will need long, sturdy tubes or pieces of cardboard to make water channels. Large shipping boxes and paper towel or wrapping paper tubes work well.
- Find an open space to build the aqueducts. Consider building outdoors on a blacktop or field where it won’t matter if water spills or leaks. If building outside, choose a day that isn’t windy, as wind will create an extra challenge for students.
- Gather the materials and decide how you’ll distribute them to the group. Consider setting up a materials table in an accessible area of the space, where students can take what they need. If working outdoors, consider placing materials in large bins to help contain them and transport them outside.
- Think through the logistics of how students will access a water source.
- Students will need water to do iterative testing of their aqueducts. You could set up a water station with pitchers of water and paper cups that students can use for testing. Expect to refill the pitchers often, and keep extra cups on hand.
- When students are ready for their final test, they’ll run a large amount of water through their aqueducts. You can use a pitcher or half-gallon jug to pour water for the test.
Success Criteria
The aqueduct must use gravity to successfully transport a half-gallon of water from one location to another without leakage or spills.
Engineering Constraint
The aqueduct must span a distance of at least three feet.
Introduce the Challenge
- Activate students’ prior knowledge by asking them what they know about where their water comes from. (Note: some students might get their water from a well. If so, discuss how wells work and then introduce the concept of aqueducts. See A Winch Lightens the Load for a related design challenge.)
- Where does the water in our faucets come from?
- How does the water get to your home?
- What is an aqueduct?
- What are aqueducts used for? Why are they needed?
- How does an aqueduct work?
- Explain that water is collected in two different ways: as groundwater and as surface water. Groundwater is found deep underground in the spaces between rocks, soil, and sediment. Large areas of underground water are called aquifers, and they supply wells with water. Surface water is fresh water found in lakes, streams, rivers, and reservoirs that comes from snowmelt, rainfall, or springs.
- Tell students that surface water that is collected in reservoirs is pumped into water treatment facilities where it gets processed and cleaned. Chemicals are added to the water, and it is filtered to remove any impurities. When the water leaves the treatment plant, it is pumped into modern-day aqueducts or pipes. The aqueducts and pipes bring the clean water into cities, towns, and homes.
- Explain that there are many aqueduct systems throughout the United States to transport water from wetter climates to drier climates. The aqueducts primarily use gravity to make the water flow, although pumps are also used along the way. Tell students that in today’s design challenge, they will design an aqueduct to transport water from one location to another using gravity.
- Show the Challenge Video. Then define the success criteria and engineering constraint.
Brainstorm Solutions
- Introduce the materials that students can use to build their aqueducts, emphasizing that their designs must be waterproof. Point out some of the materials they can use for waterproofing, such as plastic wrap, garbage bags, waxed paper, aluminum foil, etc.
- Have students brainstorm and sketch their designs. Encourage them to consider how they will use gravity to move the water. They’ll also need to make their aqueducts stable and sturdy to support the water as it travels.
- Remind students of the design constraint and success criteria, if needed.
- If building outside, take the group to the location and point out the area where they can build.
Build, Test, Redesign
- Give students time to experiment with different materials and build. As they work, circulate and provide support. To encourage students to think more deeply about their designs, ask guiding questions such as:
- What waterproofing materials are you using?
- How will you use gravity to control the flow of water?
- How can you prevent water from spilling out of your aqueduct?
- Are there ways to reinforce your aqueduct to make it sturdier or more stable?
- Which parts of your design are working well? Which parts need to be redesigned? What ideas do you have?
- Encourage students to test materials as they build and redesign as needed. Point out the water station and cups. Share any expectations around its use (i.e., water should only be used to test aqueducts, use just enough water for testing, let a leader know if a pitcher is empty, etc.).
- As students complete their aqueducts, help them evaluate whether they’ve met the success criteria. Have students measure their aqueduct to ensure that it spans a distance of at least three feet. Then have them perform the final test by slowly pouring a half-gallon of water into their system. Does it transport the water to the final destination without spilling or leaking?
Reflect
- Bring students together to discuss and share. Ask questions such as:
- What did you think of the challenge?
- Which parts of your aqueduct were easy to build? Which parts were harder to build?
- Did your aqueduct move water the way you expected? Describe some of the problems you faced. How did you solve them?
- How did you use gravity to move the water? Is there an angle that worked best?
- Read the success criteria aloud and have students raise their hands if they met it.
For thousands of years, civil engineers have been creating aqueducts to move water. While the Roman aqueducts included elaborate and decorative arched structures, modern-day aqueducts are more functional and practical. They often consist of cement canals, pipes, ditches, and tunnels.
The California Aqueduct is the largest in the world, covering a distance of 700 miles. It moves water from the northern part of the state, where water is more plentiful, to the south, where water is scarce. However, there are obstacles separating the two parts of the state. When constructing the California Aqueduct, engineers needed to develop a way to move the water through two mountain ranges. Instead of drilling through the mountains, as the Romans did, they chose to pump the water over them. The Edmonston Pumping Plant lifts two million gallons of water up and over the 2,000-foot-high Tehachapi Mountains every minute! Because of this engineering solution, the California Aqueduct is able to transport 650 million gallons of water per day from the north to the south!
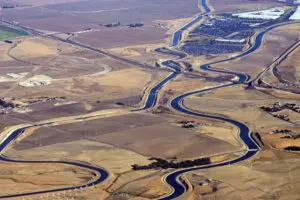
Aerial photo of the California Aqueduct CC BY-SA 4.0 Deed | Attribution-ShareAlike 4.0 International via Wikimedia Commons
Civil engineers have additional problems to solve due to changes in climate. During times of drought, groundwater is extracted in large amounts, which causes the land near the extraction site to subside, or sink. Some areas have subsided almost three feet! This leads to problems with flow, since most aqueducts rely on gravity to move water.
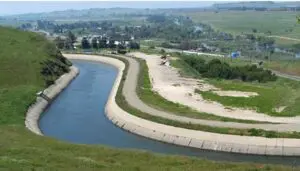
The California Aqueduct, San Joaquin Valley, California Public Domain. View Media Details
- Using an existing prototype, show students how the angle of an aqueduct can be changed by elevating the part closest to the water source. Then have students explore the angle of their aqueducts and how it affects water flow. Ask questions such as:
- How does water move through your aqueduct when you increase the angle?
- What happens if you decrease the angle?
- What is the optimal angle to make the water flow through your aqueduct? Why?
- Have students research and create informational posters that can be hung around school or another public place (be sure to get permission).
- Students can create posters showing the entire system: ways water is collected (surface and groundwater), treated, and transported using aqueducts and pipes to locations where people need water. Alternatively, they could research the aqueducts in your community or across the United States and share information, history, photos, and maps.
- Older students could research current issues that are creating stress on the water system (e.g., climate change, population growth, overextraction of groundwater, etc.). They can use their research to give presentations and educate community members or to propose solutions.
- Organize a field trip to a local water treatment facility where students can hear from an expert and view the process.
Grades 3–5
3–5ETS1-1 Define a simple design problem reflecting a need or a want that includes specified criteria for success and constraints on materials, time, or cost.
3–5ETS1-2 Generate and compare multiple possible solutions to a problem based on how well each is likely to meet the criteria and constraints of the problem.
3–5ETS1-3 Plan and carry out fair tests in which variables are controlled and failure points are considered to identify aspects of a model or prototype that can be improved.
5-ESS2-1 Develop a model using an example to describe ways the geosphere, biosphere, hydrosphere, and/or atmosphere interact.
Grades 6–8
MS-ESS3-1 Construct a scientific explanation based on evidence for how the uneven distributions of Earth’s mineral, energy, and groundwater resources are the result of past and current geoscience processes.
MS-ESS3-4 Construct an argument supported by evidence for how increases in human populations and per-capita consumption of natural resources impact Earth’s systems.
MS-ETS1-1 Define the criteria and constraints of a design problem with sufficient precision to ensure a successful solution, taking into account relevant scientific principles and potential impacts on people and the natural environment that may limit possible solutions.
Thank you! Your submission is processing.