
Activity Content Sections
Instructions
Aqueducts are channels that move water from a location with a lot of water—like a reservoir, lake, or stream—to another location that needs water. In this challenge, you’ll design an aqueduct to transport water.
To be successful, your design must meet the following criteria:
- The aqueduct must use gravity to successfully transport a half-gallon of water from one location to another without leakage or spills.
Here is the engineering constraint for this challenge:
- The aqueduct must span a distance of at least three feet.
Brainstorm
For a period of about 500 years (from 312 BCE to 226 CE), Roman engineers created systems of aqueducts to move water into their cities. The water was transported from faraway springs to supply fresh, clean water for drinking and to fill large public baths and decorative fountains. Some water traveled as far as 57 miles to reach its destination! The aqueducts were built at a slight angle, enabling them to use gravity to move the water. Most were built underground and made of stone or terra-cotta pipes; however, some were elaborate above-ground, arched aqueducts that still survive today.
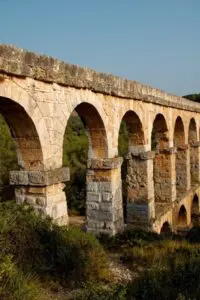
Image by Loyloy Thal from Pixabay
Your challenge is to design an aqueduct that spans at least three feet and can transport a half-gallon of water without leaking or spilling.
- Before you start brainstorming designs, consider:
- How will you use gravity to control the flow of water?
- What can you do to make your aqueduct waterproof?
- How can you prevent water from spilling out of your aqueduct?
- Are there ways to reinforce your aqueduct to make it sturdier or more stable in wind?
- Sketch some designs or jot ideas.
Build, Test, Redesign
- Experiment with materials and build. Measure your aqueduct to ensure it’s at least three feet long.
- Test different materials to waterproof your aqueduct. Then use the cups to test it with water and redesign as needed. If something is not working the way you imagined, try a different material or make changes to your design.
- For the final test, slowly pour a half-gallon of water into your aqueduct. Does it transport the water at least three feet without leaking?
- Did you meet the success criteria? If not, make changes to your design and try again.
- (Optional) If you’ve met the success criteria and want an additional challenge, try building a longer aqueduct. Can you transport the water a distance of six feet?
Reflect
- How effectively does your aqueduct transport water from one location to the other?
- What is working well? What do you think can be improved?
- What did you like and dislike about the challenge?
- What problems did you have when building, testing, and redesigning? How did you solve them?
Did your design meet the success criteria? Nice job! Share your results with a family member, teacher, or DiscoverE! You can also share photos and videos on social media and tag @DiscoverEorg.

Leave feedback form
Thank you! Your submission is processing.