
Activity Content Sections
Instructions
An oil spill is an unexpected, uncontrolled release of crude oil or refined petroleum. Oil spills occur when accidents happen—an oil pipeline breaks, a tanker ship crashes or sinks, or drilling operations leak. Thick oil spills into the ocean creating an oil slick, or a layer of oil on the water’s surface. The oil can harm or kill marine mammals, birds, fish, and plants. When oil coats feathers and fur, it removes their insulating qualities and exposes the animals to the elements. Others die by accidentally ingesting large amounts of oil.
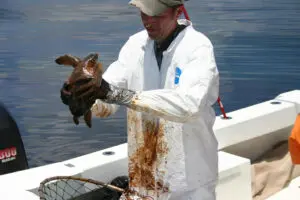
An oiled Kemp’s Ridley turtle is rescued after an oil spill.
NOAA, CC BY 2.0, via Wikimedia Commons
This challenge has two parts. In Part One, you will test different materials to find the best methods to clean up an oil spill. In Part Two, you will design, build, and test a prototype—a simple model that shows your idea—to clean up an oil spill in the ocean.
Part One
- Print a copy of the Clean It Up! handout. Read about the different types of cleanup methods: booms, skimmers, dispersants, and sorbents. You will clean up your oil spill using all of these methods.
- Prepare your oil spill. Get a tub and fill it one-third full of water. Add a few drops of blue food coloring, if you’d like. Then add one tablespoon of vegetable oil. Observe the oil and describe what you see on your handout.
- Next, clean up the oil using the different materials. Record your observations and results on the handout. Then consider:
- Which materials worked best for cleaning up the oil?
- Which materials surprised you?
- What did you discover when you tested the feather? How might this affect birds that are caught in an oil spill?
- Which materials will you use in your prototype? What ideas do you have?
- In Part Two, you’ll use what you learned to design a prototype to clean up an ocean oil spill.
Part Two
To be successful, your design must meet the following criteria:
- The design must float on the surface of the water.
- The design must withstand wind and waves.
- The design must collect at least half of the oil in the container.
Here is the engineering constraint for this challenge:
- Your prototype must use two different cleanup methods.
Brainstorm
Scientists and engineers must act quickly when there’s an oil spill! Spills can occur on land, but marine spills are particularly threatening because they can spread quickly and travel far. Large oil spills have a disastrous effect on wildlife and the environment, resulting in damage that can last for decades.
- As you brainstorm designs, think about which cleanup methods you want to use. Your prototype will need to include two different methods.
- Take a look at your materials. Think about what you can use to make your prototype float and withstand wind and waves.
- Sketch some designs or jot ideas.
Build, Test, Redesign
- Build your prototype! As you build and test, consider:
- How will your prototype use the materials to remove the oil?
- What will happen when the materials are unable to remove any more oil?
- How will your prototype float on the water? Will it be stable enough to withstand wind and waves?
- Remember to test your prototype in the tub of water. Use a spoon to create waves and the fan to produce wind. Remember to keep the electric fan a safe distance from the water.
- To prepare for the final test, clean out the oil in your tub (keep the water). Add one more tablespoon of oil. First, use your prototype to clean up the oil. Then test your prototype in waves and wind.
- Consider whether you’ve met the success criteria. If not, make changes to your design and try again.
Reflect
- What did you think of the challenge?
- Which parts of your prototype were easy to build? Which parts were harder to build?
- What were some of the problems that you faced? How did you solve them?
Did your design meet the success criteria? Nice job! Share your results with a family member, teacher, or DiscoverE! You can also share photos and videos on social media and tag @DiscoverEorg.

Leave feedback form
Thank you! Your submission is processing.