Activity Content Sections
For leader preparation:
- Fan
- Liquid dish soap
- Spray bottles (1–2)
- Tablespoon
- Vegetable oil
- Water
- (Optional) Blue food coloring
For Part One, each pair will need:
- Clean It Up! handout (one per student)
- Cotton balls (2)
- Cotton swabs (2)
- Feather
- Kitchen Sponge (1/4 piece)
- Paper towel
- Pipe cleaners (2)
- Spoon
- Spray bottle with water and dish soap (shared among the whole group)
- Straws (2)
- Syringe or eyedropper
- Tub, dishpan, or disposable aluminum pan of water (Tip: Transparent containers allow students to see the oil floating on top of the water.)
- (Optional) Waxed paper, one piece
For Part Two, provide additional quantities of the materials listed above for students to use in their designs. They might also want to incorporate recyclables, household items, or craft supplies to build their prototype, such as:
- Craft sticks
- Glue
- Plastic cups
- Plastic plates
- String or yarn
- Styrofoam
- Waterproof tape (packing, duct)
Design a prototype, using common household materials, that can clean up an oil spill in the ocean.
Background
An oil spill is an unexpected, uncontrolled release of crude oil or refined petroleum due to an accident from a tanker, rig, well, or offshore drilling platform. It can happen deep underwater at the source of the drilling, or on the water’s surface as oil is being stored or transported. Spills can occur on land, but marine spills are particularly threatening because they can spread quickly and travel far. Large oil spills have a disastrous effect on wildlife and the environment, resulting in damage that can last for decades. Environmental and petroleum engineers are critical in helping to understand, assess, and mitigate the potential damage when an oil spill occurs.

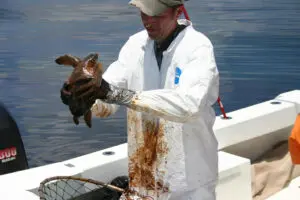
An oiled Kemp’s Ridley turtle is rescued after an oil spill.
NOAA, CC BY 2.0, via Wikimedia Commons
How to Use This Activity
- Review these Leader Notes. Then decide how to group students to complete the activity. If possible, have students work in pairs, since each pair will need their own tub of water.
- Make copies of the Student Instructions and Clean It Up! handout so that each student has their own copy to use during the whole-group activity.
- Find two or three photos on the internet of historic oil spills to show the widespread damage they cause to animals, beaches, habitats, and the environment.
- Gather the materials and decide how you’ll distribute them to the group. For Part One (initial testing), you may want to put together baggies of materials to distribute to the pairs. For Part Two (the design challenge), consider setting up a materials table in an accessible area of the room where students can take what they need.
- Find a space and set up.
- Use flat tables for both parts of the activity. You may want to cover the tables with a waterproof tablecloth or a few layers of newspaper, since students will be working with oil and water.
- Prepare the tubs, one per pair. Fill each tub a third full of water and add a few drops of food coloring, if using. (Food coloring simulates the ocean and makes it easier to see the oil.) Wait to add the oil.
- Mix the dispersant by adding warm water and a few squirts of liquid dish soap to the spray bottle(s). Gently swirl to dissolve the dish soap.
- (Optional) Tear off squares of waxed paper, one per pair. The waxed paper will hold the used oily materials so they can be neatly disposed of.
Success Criteria
- The design must float on the surface of the water.
- The design must withstand wind and waves.
- The design must collect at least half of the oil in the container.
Engineering Constraints
- The prototype must use two different cleanup methods.
Instructions
Introduce the Challenge
- Activate students’ prior knowledge by showing a few photos and asking students what they know about oil spills and the damage they cause to the environment.
- What is an oil spill? Where do they occur and how do they happen?
- How does an oil spill affect the environment? What happens to the plants and animals when an oil spill occurs?
- How do people clean up oil spills?
- Provide background information. Explain that oil spills are environmental disasters that occur when accidents happen. Sometimes oil pipelines break, tanker ships crash or sink, or there are problems with drilling operations. Thick oil spills into the ocean creating an oil slick, or a layer of oil on the water’s surface. The oil can harm or kill marine mammals, birds, fish, and plants. When oil coats feathers and fur, it removes their insulating qualities and exposes the animals to the elements. Others die by accidentally ingesting large amounts of oil.
- Tell students that today’s activity consists of two parts:
a) In Part One, they’ll experiment with different cleanup materials to determine which are the most effective.
b) In Part Two, they’ll design a prototype—a simple model that shows their idea—for a device that can clean up an oil spill in the ocean.
Part One
- Show students the materials they can use to clean up their oil spills. Explain how to use the waxed paper as a plate for the used, oily materials. Then distribute the Clean It Up! Introduce the different types of cleanup methods and review how to complete the table.
Booms—long, floating barriers, similar to pool noodles. They stop the oil from spreading.
Skimmers—machines that scoop up the oil from the water’s surface. They work best in calm waters.
Dispersants—chemicals that are sprayed onto the water to break up oil slicks into smaller droplets. They work like liquid soap.
Sorbents—materials that absorb oil from the surface of the water. They are best used in small spills or to clean up final traces of oil.
- Distribute tubs of water and add one tablespoon of oil to each one. Have students observe the oil and describe what they see on their handout.
- Give students about 15 to 20 minutes to test the different materials and complete the handout. Then bring the group together to briefly discuss their observations and findings. You might ask:
- What did you notice when the oil was poured into your tub?
- How did it look after a couple of minutes?
- Which materials worked best for cleaning up the oil?
- Did any materials surprise you?
- What did you discover when you tested the feather? How might this affect birds that are caught in an oil spill?
- Which materials will you use in your prototype? What ideas do you have?
Part Two
Brainstorm Solutions
- Tell students that they will use what they learned about cleaning up oil spills to design a prototype. Then present the design challenge and define the success criteria and engineering constraints.
- Point out the additional materials that are available to students to build their prototypes. Encourage students to be creative and seek out other materials, if needed.
- Have students work in pairs to brainstorm and sketch ideas for their prototype.
Build, Test, Redesign
- Give students time to experiment with the materials and build. As students work, refill the tubs of water and oil, if needed.
- Circulate and provide support. To encourage students to think more deeply about the challenge, ask guiding questions such as:
- How will your prototype use the materials to remove the oil?
- What will happen when the materials are unable to remove any more oil?
- How will your prototype float on the water? Is it stable enough to withstand wind and waves?
- Encourage students to use their tubs of water to test as they build and redesign as needed. They can use a spoon to create waves and the fan to simulate wind. They will need to constantly assess whether their prototype is functioning as planned. If it’s not, they will need to make adjustments, or they might need to change their design entirely.
- To prepare for the final test, have students clean out the oil in their tub (keep the water). Add one more tablespoon of oil. Have students demonstrate how their prototype works. Then test the prototype in wind and waves. Together, decide whether the prototype meets the success criteria.
Reflect
- Bring students together to discuss and share. Ask questions such as:
- What did you like and dislike about the challenge?
- Which parts of your prototype were easy to build? Which parts were harder to build?
- What were some of the problems that you faced? How did you solve them?
- Who would like to demonstrate how their prototype cleans up an oil spill?
- Read the success criteria aloud and have students raise their hands if they achieved them.
STEM Connections
Engineering & Science Connections
Environmental engineers fill an essential role when there are oil spills. They use computer modeling and satellite images to predict how the oil will spread and how fast it will travel, based on winds, tides, and ocean currents. They also examine a variety of factors to determine the level of threat and the best strategies for cleanup. They consider:
- weather patterns
- the distance of the spill to places where people gather
- the potential impact on animals, birds, and plants that live in the ecosystem
- the type and amount of oil spilled

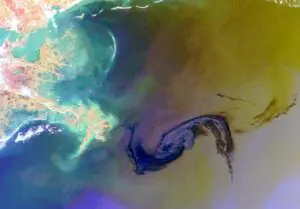
A satellite photo shows the spread of oil in the Gulf of Mexico.
Envisat satellite, CC BY-SA 3.0 IGO, via Wikimedia Commons
Environmental engineers have developed many different tools to clean up oil spills, including booms, skimmers, dispersants, and sorbents. Booms are long, floating barriers, similar to pool noodles, that stop oil from spreading. Booms are used to keep oil away from areas that need to be protected, such as beaches and wildlife habitats. Skimmers are machines that scoop up oil from the water’s surface. Skimmers can be used from shore, can be launched from boats, or can propel themselves. They work best in calm waters. Dispersants are chemicals that are sprayed onto the water to break up oil slicks into smaller droplets. They work like liquid soap and are most effective when applied immediately to light- or medium-weight oil. Sorbents are a group of natural and manufactured materials used to absorb oil from the surface of the water. Since there are strict regulations about their disposal, sorbents are best used in small spills or to clean up final traces of oil.

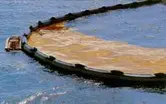
A boom is used to prevent oil from spreading.
Mineral Management Service, US Department of the Interior
Extensions
- Challenge students to improve their prototypes to collect 100% of the oil. Can students combine multiple cleanup methods to create a prototype that is 100% effective (or close to it)?
- Have students research and create informational posters about historic oil spills and their long-term effects on the environment. Then organize an awareness event at school or another community venue. Students can display and discuss their posters, show their prototypes, and demonstrate how they work.
NGSS Standards
Grades 3–5
3-LS4-4 Make a claim about the merit of a solution to a problem caused when the environment changes and the types of plants and animals that live there may change.
3-5ETS1-1 Define a simple design problem reflecting a need or a want that includes specified criteria for success and constraints on materials, time, or cost.
3-5ETS1-2 Generate and compare multiple possible solutions to a problem based on how well each is likely to meet the criteria and constraints of the problem.
3-5ETS1-3 Plan and carry out fair tests in which variables are controlled and failure points are considered to identify aspects of a model or prototype that can be improved.
4-ESS3-1 Obtain and combine information to describe that energy and fuels are derived from natural resources and their uses affect the environment.
5-ESS3-1 Obtain and combine information about ways individual communities use science ideas to protect the Earth’s resources and environment.
Grades 6–8
MS-ESS3-3 Apply scientific principles to design a method for monitoring and minimizing a human impact on the environment.
MS-ETS1-1 Define the criteria and constraints of a design problem with sufficient precision to ensure a successful solution, taking into account relevant

Leave feedback form
Thank you! Your submission is processing.