

Activity Content Sections
GETTING READY
Prepare the towers:
- Mark PVC pipes with two diametrically opposite awl marks at the following heights from the base: 3′, 4′, and 5′ (see Figure 1).
- Screw hooks into awl marks with open end of hooks facing up.
Prepare the roadway segments:
- Assemble all 12 boxes BUT do not seal one end of each—you will need to reach into the boxes later. You may choose to paint the boxes black to resemble a roadway.

- Reinforce the middle of each box with a layer of duct tape.
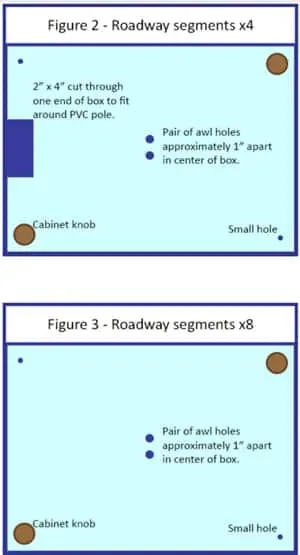
- Cut 4 boxes as illustrated in Figure 2. These boxes will be the road segments closest to the towers. WARNING: It may be difficult to start the cut on the side of the box. Be careful to avoid cutting yourself.
- In the center of each of these 4 boxes, poke holes large enough to pass the clothesline through (again, see Figure 2). Poke a smaller hole in each corner. Affix two cabinet knobs on opposite corners by feeding the screw through a hole and reaching into the box (see photo next page).
- Prepare the remaining 8 boxes as illustrated in Figure 3. These boxes will make up the rest of the road segments. Be sure to affix the cabinet knobs to the same corners on every box.
- Tie a knot in the end of each length of shock cord. Feed the free end of each cord through the holes in opposite corners of each box. Test that the knot prevents the cord from being pulled through the hole. Use the cord locks to make an adjustable loop on the end of each cord (see photo next page).
Prepare the cables:
- There are 3 lengths of cable, labeled A, B, and C in Figure 4. Cut the clothesline to make 4 cables of each length listed below—12 cables total. The lengths provided are longer than you need, to allow plenty of extra length for tying knots.
- A = 36″
- B = 60″
- C = 80″

- Attach a short cable (A) to one of the 4 roadway segments that were cut as in Figure 2. Push one end of the cable down through a hole in the top of a box, reach inside, and push the cable back up through the other hole. Tie a knot to make this loop permanent, and then seal the box. Repeat with the remaining short cables and cut roadway segments.
- Alternately, you can double the rope back on itself and use duct tape or wire ties to secure the loop, rather than tying a knot.
- Repeat this process with the longer cables and uncut roadway segments.
- Assemble the bridge before your event to familiarize yourself with the procedure. Adjust the knots as necessary and trim excess clothesline, if desired. Make sure you know how to tie a slipknot, and be prepared to demonstrate tying one to participants.
INTRODUCTION
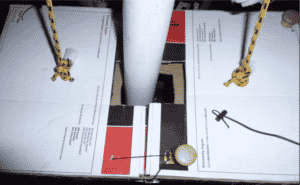
Connect the roadway segments by securing the shock cord loop on one box to the knob on the adjacent box. Credit: Reed Brockman/American Society of Civil Engineers.
There are several types of bridges, each with their own advantages and disadvantages. In this activity, participants help assemble a model cable- stayed bridge.
Ask questions to get participants thinking about bridges:
- Why do we build bridges? (To cross over rivers, ravines, etc.)
- What do we need to think of before building a bridge? (Size, use, materials, etc.)
- How are large bridges different from small bridges? (Large bridges use trusses, suspension systems, and arches to provide support; small bridges can be a simple beam spanning a gap.)
- What makes bridges strong? (Trusses, cables, and other components direct forces on the bridge to the ground.)
Instructions
Relevant Terminology
Compression: A force that squeezes an object from opposite directions, pushing two points towards each other. Smashing a can with your foot puts it under compression.
Load: The weight that something must support. A bridge has to support the weight of cars driving across it.
Pier: The base of a vertical support for a bridge. Usually it’s a big, concrete pad on which the towers sit.
Roadbed: The part of the bridge on which cars, trains, or pedestrians travel.
Tension: A force produced from stretching or pulling something in opposite directions. A tug-of-war rope is under tension.
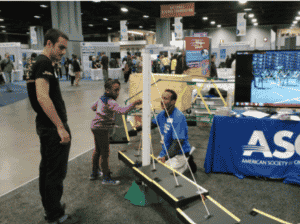
A child helps connect a cable to the PVC tower. Credit: American Society of Civil Engineers.
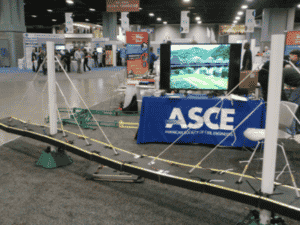
A fully assembled cable-stayed bridge. Credit: American Society of Civil Engineers.
Guiding Questions
STEM Connections
GUIDANCE FOR YOUNGER CHILDREN
Engineering Connections
Think about all of the different types of bridges that you’ve seen. Bridges are an important part of our communities, and they serve a variety of purposes. We need bridges to help transport materials (and people) from one point to another, usually over a river or other body of water. Engineers have a lot to think about when they design bridges. They need to know how long the bridge needs to be, how much weight it will need to hold, which types of materials would work best, as well as other information about the needs and location required of the bridge. Cable- stayed bridges, for example, are typically used to span medium to long distances.

The Millau Viaduct in France is a cable-stayed bridge that crosses a wide valley. Credit: Richard Leeming/flickr.
The tallest cable-stayed bridge is the Millau Viaduct in France. It is 1,125 feet tall and more than 8,000 feet long! This beautiful bridge opened in 2004 and connects a major highway across a wide valley. The Millau Viaduct is considered by many to be a work of engineering art, both pleasing to look at and capable of providing drivers with a breathtaking view of the valley below.
Science Connections
A bridge must be able to stand up to the weight of whatever is being transported across it, whether that’s cars, trucks, or trains, as well as any materials or people that these vehicles are carrying. Anything that has weight that pushes down on a bridge is called a load. The weight of a load comes from gravity.
The load on a bridge must be redirected from the roadway to the towers. Gently push down on the bridge you just built. What happens to the cables? They get pulled tight! The force of the load gets transferred to the cables and then to the tower. It’s like a tug-of-war with kids on one side and adults on the other. In this case, the kids are like the roadway and the adults are the big strong tower.
GUIDANCE FOR OLDER YOUTH AND ADULTS
Engineering Connections
There are so many decisions to make about a bridge’s design. Structural engineers must carefully consider the specific needs of each bridge project and must also have an understanding of the forces at work on bridges. When they draw up detailed plans for a bridge’s design, including measurements, shapes, and materials, they consider the advantages and disadvantages of the different types of bridges. Cable-stayed bridges like the one in this activity involve cables attached to one or more towers that are separated by medium to large distances. These bridges are often used to cross waterways or valleys.
The Sunshine Skyway in Tampa Bay, Florida, is a cable-stayed bridge that is over 4 miles long! This bridge replaced another, older bridge that was hit and partially destroyed by a ship in 1980. When deciding what type of bridge should replace the one that had been destroyed, engineers chose a cable-stayed bridge because the large distance between the towers made it far less likely that one of the large container ships passing underneath it would hit it. This is an example of how engineers design bridges for specific purposes, always keeping safety in mind.
Science Connections
Bridges are affected by several types of forces, but two in particular are tension (“pulling”) and compression (“pushing”). By balancing between the pull of one and the push of the other, bridges can withstand heavy usage year after year. In a cable-stayed bridge, the greatest tension forces are experienced by the steel cables that hold up the roadway, as the bridge’s roadbed is pulled down by the weight of the vehicles and goods transported across it.
In contrast, the greatest compression forces in a cable-stayed bridge are experienced by the primary bridge towers and the piers on which they sit. These towers are only strong when the forces are balanced: if the force on one side of the tower is much greater than the corresponding force on the other, then one side of the tower will experience tension while the other is under compression. This can compromise the strength of the bridge, since the concrete towers are weak under tension. To avoid this, engineers carefully calculate the load on both sides of the tower to ensure that they are as close to equal as possible.
Leave feedback form
Thank you! Your submission is processing.